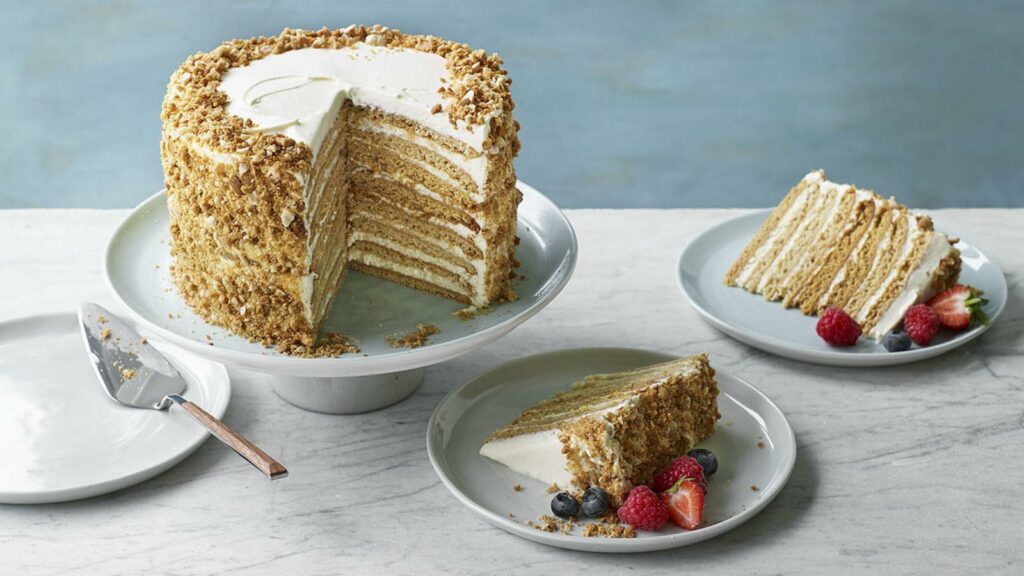
Nadiya’s 8-layer Russian honey cake isn’t really cake at all. Layers of honey and browned butter biscuit-like rounds are stacked up with a soured cream and honey icing and topped with hazelnuts and biscuit crumbs.
Ingredients
For the cake
- 80g/2¾oz unsalted butter
- 270g/9¾oz runny honey
- 120g/4½oz golden caster sugar
- 2 free-range eggs, lightly beaten
- 1 tsp bicarbonate of soda
- 500g/1lb 2oz plain flour, sifted, plus extra for dusting
- fresh berries, to serve
For the filling
- 600ml/20fl oz soured cream
- 80g/2¾oz icing sugar
- 250ml/9fl oz double cream
- 65g/2½oz runny honey
- 1 tsp vanilla bean paste
To decorate
Method
- Put the butter in a small saucepan, bring to the boil, then reduce the heat and cook until starting to brown. As soon as the little grains of milk solids become dark, take off the heat. Add the honey and sugar and heat until the sugar has dissolved. Tip into a large bowl and leave to cool for 15 minutes. Add the eggs and mix well. Add the bicarbonate of soda and the flour and mix until a smooth dough forms. Cover and chill in the fridge for at least 2 hours.
- Roll the dough into a sausage shape and divide into 8 equal pieces. You can weigh them if you want to be exact. Dust a surface and your hands generously with flour and shape the 8 pieces into balls.
- Line 2 baking trays with baking paper and preheat the oven to 180C/160C Fan/Gas 4. Find or create an 18cm/7in round template, using a plate or the base of a cake tin, for example.
- Dust a ball of dough with flour, then place between 2 sheets of baking paper and roll out to about 3mm thick. Use the template to cut out a circle, making sure to keep all of the scraps. Repeat with all 8 balls. Pop the circles onto the baking trays (however many will fit) and bake for just 5 minutes. As soon as they are baked, take off the tray, transfer to a wire rack and repeat until you have done all 8. Arrange the scraps in an even layer across the 2 trays and bake for about 5 minutes until they are really crisp and golden. Set aside.
- To make the filling, mix together the soured cream and icing sugar really well in a bowl. Place the double cream in a separate large bowl and whip to soft peaks. Fold in the soured cream mixture, honey and vanilla.
- It is best to assemble this cake directly on a serving plate (one that can fit in the fridge). Use a dab of the cream filling to secure the first circle onto the serving dish. Drop about 3 tablespoons of the cream mixture on top and carefully spread evenly all over. Put the next circle on and repeat until you have done all 8 layers. You should still have enough cream to cover the top and sides, so do exactly that and smooth over as best you can. It doesn’t have to be perfect, because we are going to really cover this up.
- Put the baked scraps in a food processor and blitz to a fine crumb. Mix in the roasted hazelnuts and salt. For extra decoration, I like to create a heart-shaped template that just fits the top of the cake and lay that on top, but choose whatever shape you like – even use a doily, if you can find one or know what one is! If you don’t want to use a template, just mark a heart (or other shape) on the icing with a cutlery knife and use that as a guide for where to stick the crumbs.
- Take the crumb mixture and gently press onto the sides and the top around your template, before removing it. You might have to pipe more filling onto your shape to neaten up the edges. Transfer to the fridge to set and chill. Serve with the fresh berries.